Tuesday, November 5, 2019

How to set up a task and manage cron job in one place with cron job manager module

How to run cron jobs with Cron tasks manager module?

To start running your prestashop-thirtybees task scheduler, login to your back office dashboard. Go to Modules and Services. Search the word "cron". You should be able to see a screen similar to the image below.
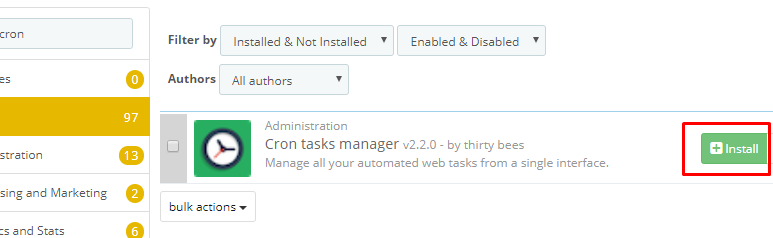
task scheduler
Click on the configuration and start scheduling your tasks. First off, copy the url like the one below. If you do not see the url, don't worry about it. We will get to it more, later.
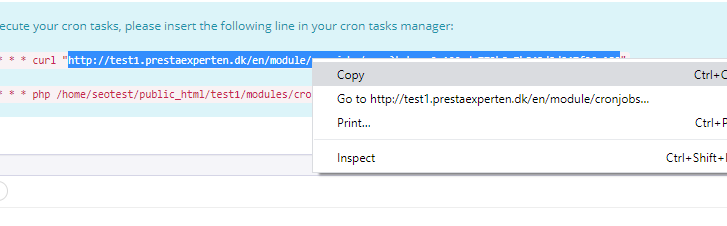
cron jobs
Click on the "+" icon to the right side of the page to create your first task.
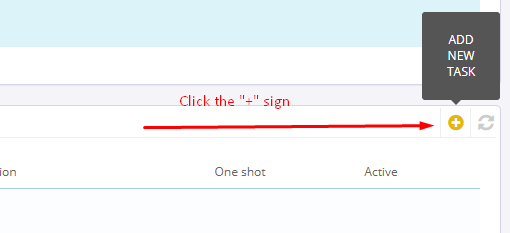
cron jobs
At the Add new task page, give your task a name or description to distinguish it from your other tasks, then paste the url link you copied in the previous page. Leave the other value untouched. This should give you more than enough functionalities for your first cron job task.
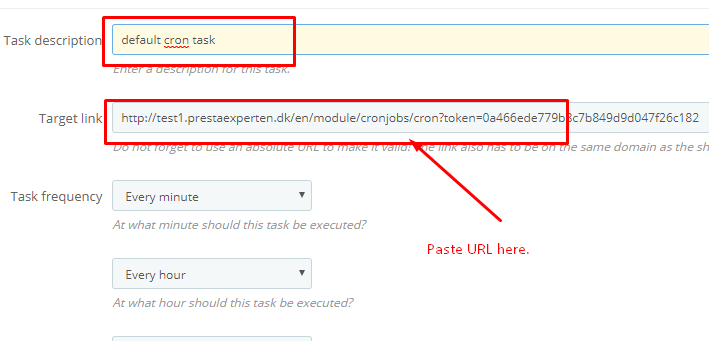
cron jobs
Click Save to save what you have done so far. Your task should appear at the bottom of the  page under "Cron Tasks", like so.

What are the elements to update when you run prestashop-thirtybees task scheduler?

There are four areas in your ecommerce store that you need to automate updates. The sitemap module (important), the product search (important), the Currency, and the Layered navigation module. Let's go through them one by one.

#1. Creating a task scheduler to automatically update the website sitemap.

The Sitemap module comes with a cron job functionality. But we want to manage our cron jobs on a single interface. So, what we will do is copy the urls to the Cron Job Manager modules. To do this and start running a cron job and automatically update and build your sitemap, go to Modules and Services, the search for sitemap. Click configure.
task scheduler
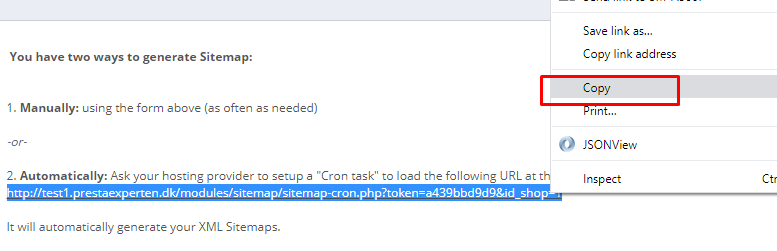
Scroll down to the bottom, and copy the url under the number 2 options "Automatically". Go back to the Cron Job manager configuration, and add another tasks.
task scheduler
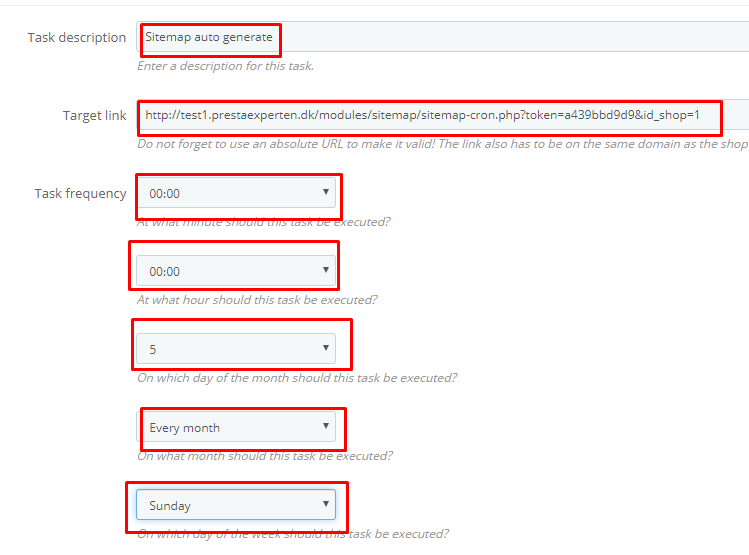
Give your task a description, i gave mine "Sitemap auto generate". Paste in the link copies from the sitemap module configure page. Give it the necessary task frequency as you like. Mine is set above, like so.
Save your work and refresh your frontpage to see if there are any errors on the page.

#2. To run cron job on Currencies, go to Localization >> Currencies.

Scroll down to the bottom of the page and you will see the link. Copy it then follow the same procedure we did when we created the task schedule for sitemap, like so.

#3. For the Product Search cron job. Go to Preferences, then Search.

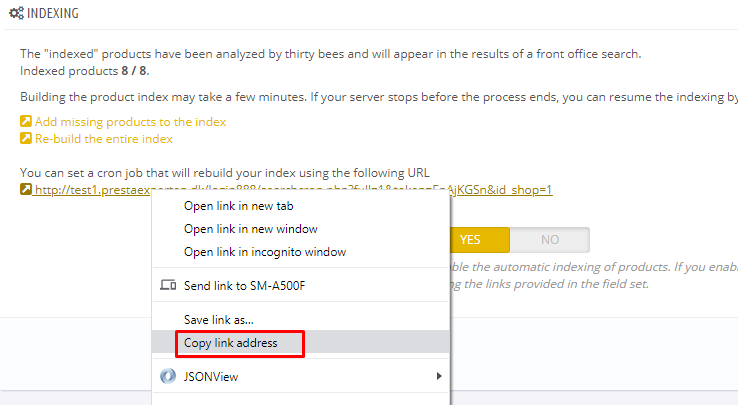
Look for "Indexing" tab. You should see a "You can set a cron job that will rebuild your index using the following URL" message. Copy the url, then go back to the Cron Job Manager, then create a new task schedule. Run the same process as you did with creating the sitemap task scheduler.
task scheduler
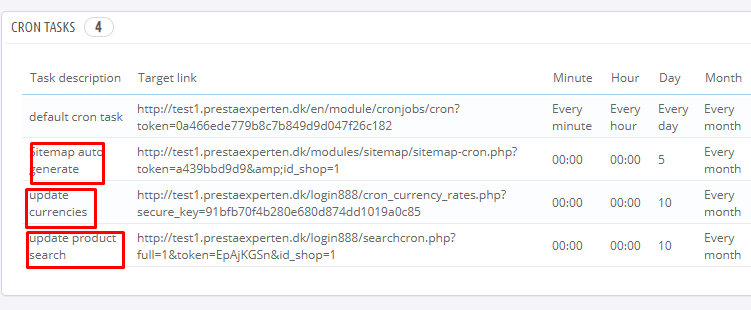
You Task Scheduler tab should look like the image below:
task scheduler

#4. The last item we need to run an automated task scheduler is the layered navigation module.

To implement a cron job on the layered navigation module is easy. It is similar to how we did on creating a task scheduler for sitemap. Go to the Modules and Services menu again, search the layered navigation module, then, click configure.
In the layered navigation module configure page, you will see three links that you need to insert to your Cron Job Manager. Copy them, like so.
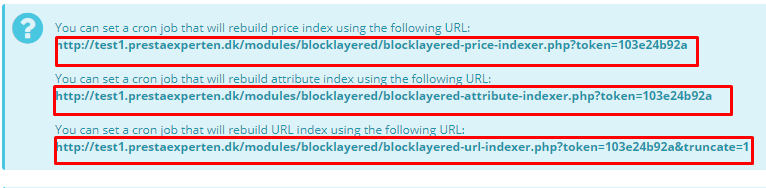
task scheduler
You will need to create a task for each of these url link. One for price index, one for attribute index, and another for URL index. Follow the same procedure we did when we created the task scheduler for sitemap. Once done, your Tasks Tab should look like the screenshot below, like so.
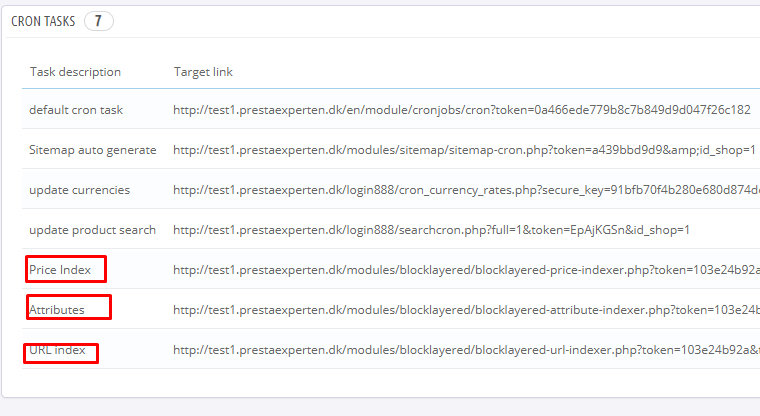
task scheduler
At this point, your task is done. Congratulations! You successfully setup your automated task scheduler for your webshop!

In conclusion

Setting an automatically scheduled task will not only be practical but will also prevent missing the supposed action to take on time.
Cron Job is a great way to manage such tasks either as a system administrator, shop manager/owner or any professions like a web developer. The good thing is that, running a cron job is not just for seasoned IT vets anymore. You can easily do it with the handy Cron Job Manager for prestashop-thirtybees. All you need to do is to use install it, and enter in the cron job urls in the right place.
Let us know if this tutorial is useful in the comment section. Don't forget to share to friends. Thanks!

Monday, November 4, 2019

How to Discover Product Defining Keywords For Your Ecommerce Website


Utilize your keywords wherever possible and as often as you need to! Insert your keywords into blog posts, social media posts and your website’s content. The more you use keywords within your content, the easier it will be for your target audience to find you.

How to Discover Product Defining Keywords For Your Ecommerce Website

Friday, November 1, 2019

3 Easy Ways to Find Your Website Target Audience

To find your website target audience is one of most important tasks you need to do as an ecommerce website lead digital marketer. It is the basis of all your online marketing strategy. It starts the moment you develop and name your products or services to the marketing channels you use to promote them.
Here’s a hint before we dig in:
Your target audience is not “EVERYONE.”
The primary reason you are defining your target group is to identify and understand your particular niche so you can dominate it.
It cannot be stressed enough that the better you understand your target market, the more closely you’ll be able to focus your ecommerce marketing strategy. This way, you only spend to reach the audience that will most likely to convert to customers. As you begin to go deeper into your audience insight, it is good to expect to see higher conversion rates and better return on your investments.

Let us define what is a Target Audience first before anything?

A target audience is a specific group of people with shared characteristics who are most likely to be interested in your products or services. Often, businesses use what they know about their target audience to create user personas. These personas guide their decisions on marketing campaigns.
Source.
It is worth noting that to find your website target group, look for their shared characteristics. They usually will share 2-3 of the following:
Gender
Age
Profession
Location
Income or education level
Marital status
For customers to feel connected to a product, service or brand, they need to relate to the content and tone of the company’s message.
You don't make your sales pitch for a sports item to elderly people group. You market it to young people and athletes! That is called speaking their language. Knowing which audience you’re targeting with each campaign will ensure that you speak their language. Understanding this important key allows you to zero in on them more easily.

So, Why is Having a Target Audience Important?

There are a bunch of reason why finding your website target audience is important. The more obvious reason is marketing focus. When you know your target audience, you get to focus your marketing effort. You can avoid unnecessary wasting of resources because you are able to reach the right people the right way. It enables you to identify the market well enough to hone your marketing effort to get better. As a result your money is spend better and wisely because you are able to craft target specific messages for your customers.

Read full article 3 Easy Ways to Find Your Website Target Audience
Find great resource on ecommerce website at shoptech media

Thursday, October 31, 2019

How to Differentiate Your Ecommerce Website From Competitors in 3 Effective Ways


How to Differentiate your ecommerce website from competitors in a highly competitive digital market is easier said than done. There are definite reasons why certain ecommerce development teams charge more than their competitors. And today, we are going to be looking at those effective ways most digital marketers and product designers go about differentiating one product from its competitors.
No matter what type of online store or business you are running, there are going to be others going after your customers. Winning over new customers and upselling old ones has become more challenging, to say the least.
In this article we will look at the fundamental aspects of differentiating your online store or business from that of your competitors. This is not going to be about techniques and skills. I want to present this from my point of view as a consumer myself.
Let’s dive right in!

How Do I Differentiate certain ecommerce website from others?

#1. With how they offer their products or services in the way that they’d use it themselves.

Talk about how your customers will love your website so much is a really good way to differentiate your ecommerce website from your competitors. When your customers looks forward to seeing it each day. Your friends are gonna ask you what your secret is.
Let’s be honest. Most people don’t care about how much work you put into designing the ecommerce website. They want to know how your product or service will benefit them. So you have to paint a very clear picture of how much better their lives will be as a result of buying what you’re selling. Your ecommerce website must be able to add value to your customers’ lives.
Another thing you can do to present your product or services in a way you’d use it yourself is to make visitors feel more at home with you. When people doesn’t know you yet, they require a good deal of selling on your part to convince them that you deserve their business. Testimonials play an essential role in making prospects feel more at home with you. People are relational in nature. When they see others are using and feeling good about your product or services, they would be more open to paying for it.
How to Differentiate Your Ecommerce Website From Competitors in 3 Effective Ways

Wednesday, October 30, 2019

Strategies to mitigate the occurrence of product return issues

Start  a Simple After sales steps you can do right away:

  1. Send an acknowledgement – a simple thank you note acknowledging the sale and hoping for a continued association will do,
  2. Ask if they need any help with their purchase (if it is an appliance, they may need help in setting it up),
  3. Offer follow-up services in case of products that are a regular buy (like groceries),
  4. Ask for feedback and work on any pain points.
Strategies to mitigate the occurrence of product return issues

How to implement article and product data structure article schema?

How to implement article and product data structure article schema?

Tuesday, October 29, 2019

How to install a prestashop-thirtybees addon?

Installing a prestashop-thirtybees addon is a straight-forward process. This article is going to walk anyone through the installation procedure as simple and easy as possible. It does not matter if you are a seasoned web developer just starting to work on Prestashop-thirtybees ecommerce system, or someone who is migrating your ecommerce website from another platform, or a newbie trying to run an ecommerce website. This article is for you.
Before you get yourself wet, I believe it would serve you well if you get a really background what Prestashop is and  what is thirtybees ecommerce platform. Click the links to grasp an good idea around these beautiful ecommerce systems. You may also visit their individual websites. links below.
Source: Prestashop  Thirtybees
Alright, let's dive in!

How to install a prestashop-thirtybees addon?

We will assume that you have your module zip file ready somewhere in your local hard drive.
There are two ways to install a prestashop-thirtybees addon. The first and easiest one is through the back office of your prestashop-thirtybees ecommerce install. The easier one is by manual install through FTP or Cpanel upload. The more reliable way to install a prestashop-thirtybees module is using the later.
With that said, we will explore both routes in this article. Be reminded that installing through the back office might present some issues. The reason for this is sometimes your web server interferes with the upload and installation process when done through the back office of your prestashop-thirtybees system. Another issue is that, the zip file might have 2 level deep directory. And further, there might some memory issue during the upload process. I usually install addons throught FTP and Cpanel, it's safer although it takes a little bit of work, but not much.

Installing through the back office

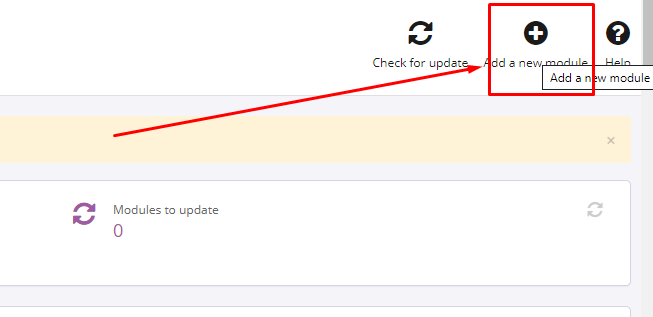
To install through the back office, login to your prestashop-thirtybees back office, go to Modules and Services. Find the Add a new module at the top of the page, and click to upload your module zip file, like so.
how to install prestashop addons
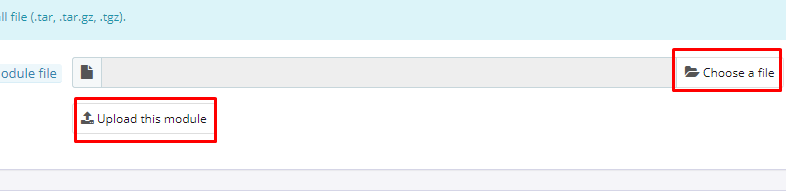
Choose your module zip file, then click the upload button.
install prestashop addon
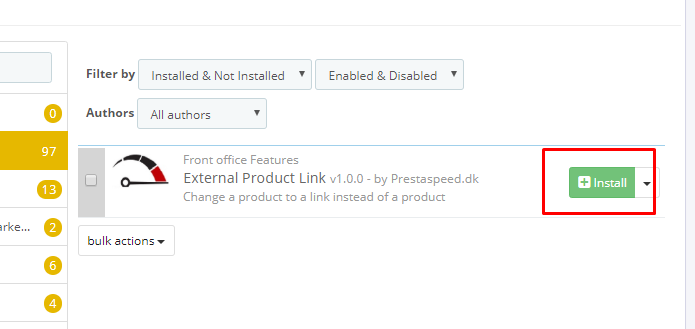
If your prestashop-thirtybees addon is properly uploaded, you should get a success notification at the top of the page. You should be able to see the newly uploaded module. Take a look at the screenshot of my install below.
install prestashop addons
Click the install button. And then configure module if needed.

Installing through FTP client or Cpanel upload

Uploading module files through FTP

  • Unzip (decompress) the module archive file
  • Using your FTP software
  • Place the folder in your PrestaShop-thirtybees /modules folder

Uploading module files through Cpanel

  • Login to you domain Cpanel
  • Navigate to File Manager
  • Open your PrestaShop-thirtybees /modules folder
  • Upload the zip file
  • After upload is done, right click on the module zip file and click Extract

Installing your prestashop-thirtybees module

  • Login to the BackOffice of your shop
  • Go to Back Office >> Modules.
  • Search for your module name in the list
  • In the row for the new module, click Install.
  • Locate the module again. If necessary, click >> Configure.
  • Once configuration is complete, be sure to test the module immediately to confirm that it functions as planned.
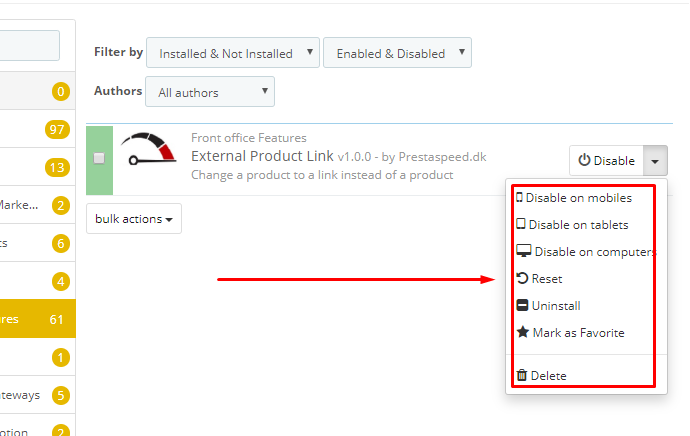
Your installed module should look like below.
install prestashop addon
Some modules does not require configuration. If your module requires configuration, the Configure button will show up in the drop down, like so.

Common installation issues with prestashop-thirtybees modules.

There are common installation issues with prestashop-thirtybees modules, and these issues usually relates to your server, file permission, server, memory limits, etc. Below are the most common ones.
  • Memory limit
  • " Your PHP sessions path is not writable - check with your hosting provider: C:\Windows\Temp\ "
  • " PHP parameters: PDO MySQL extension is not loaded "
If you error installation issue is about memory limit, simple increasing your server memory will do the trick. You may have to contact your web hosting service provider to do this.
If you encounter the last two error messages during the process of installing through the back office, contact your web host provider. The first one is an issue with windows server, and the last one is an issue of PHP extension. You may as well check if your PHP version is set to the latest PHP 7 version. Most of the times, upgrading PHP would solve those issues right away.
There you have it. That is the way to install a prestashop-thirtybees addon. Let us know your concern in the comment section below. And if I may make a request, please share to someone you know or share to your social media friends. Thanks and wish you success!